How to Invite and Manage Team Members in Dyzo.ai

Introduction
Building a remote team comes with one persistent challenge: getting everyone into the same system, working under the same structure. If your team is not set up correctly in your productivity tool, you lose visibility before the workday even starts. This guide shows you exactly how to invite team members to Dyzo.ai, assign them to the right projects, and manage their access — so your entire team is tracked, accountable, and visible from day one.
Why Team Setup Matters in Dyzo.ai
Without a properly configured team, Dyzo cannot do its job. If members are missing from your workspace, their time logs go unrecorded. Their tasks are not assigned. Their attendance is not tracked. You lose the exact visibility Dyzo is built to give you. Getting your team structure right from the start means:
- Every member's work is logged and visible
- Managers can see who is active, idle, or offline in real time
- Tasks, reports, and time logs are tied to the right people
- Accountability is built into the workflow by default
How Team Member Setup Works in Dyzo.ai
In Dyzo.ai, adding team members follows a specific two-step flow: you first create a project, and then add members to it. There is no standalone team directory you manage separately — team membership is organized around projects. This keeps everything focused and avoids unassigned time logs. There are two types of members you can add:
- In-house members — people already inside your Dyzo organization. They can be added directly to a project without sending an invite.
- Outside members — people outside your organization who need to be invited via email. They receive an invitation link and are automatically added to the project once they accept.
Step-by-Step: How to Create a Project and Add Team Members
Step 1: Go to Projects and Click "Add Project"
From the left sidebar, click on Projects. On the dashboard, you will see a + Add Project button in the top right of the Projects section. Click it to open the project creation flow. 
Step 2: Enter a Project Name
A dialog box will appear asking you to enter a Project Name. Type the name of your project and click Next. This is a two-step process — the first step creates the project, the second step is where you add your team. 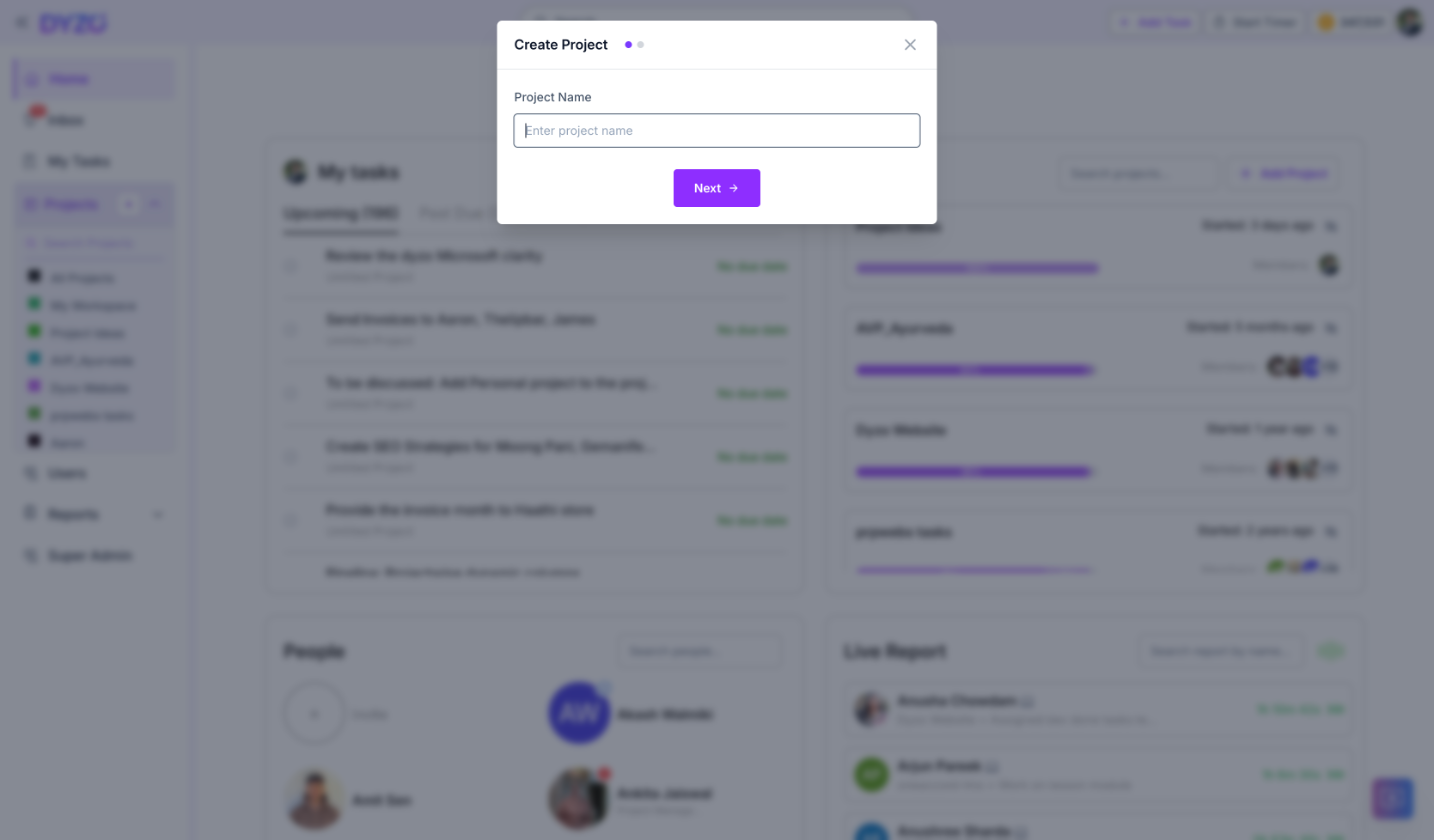
Step 3: Add In-House Team Members
On the next screen — Invite Team Members — you will see a list of all existing members inside your Dyzo organization. These are your in-house members. To add an in-house member, simply click the + button next to their name. They are added to the project immediately without needing to accept an invitation. You can add as many in-house members as you need at this stage. 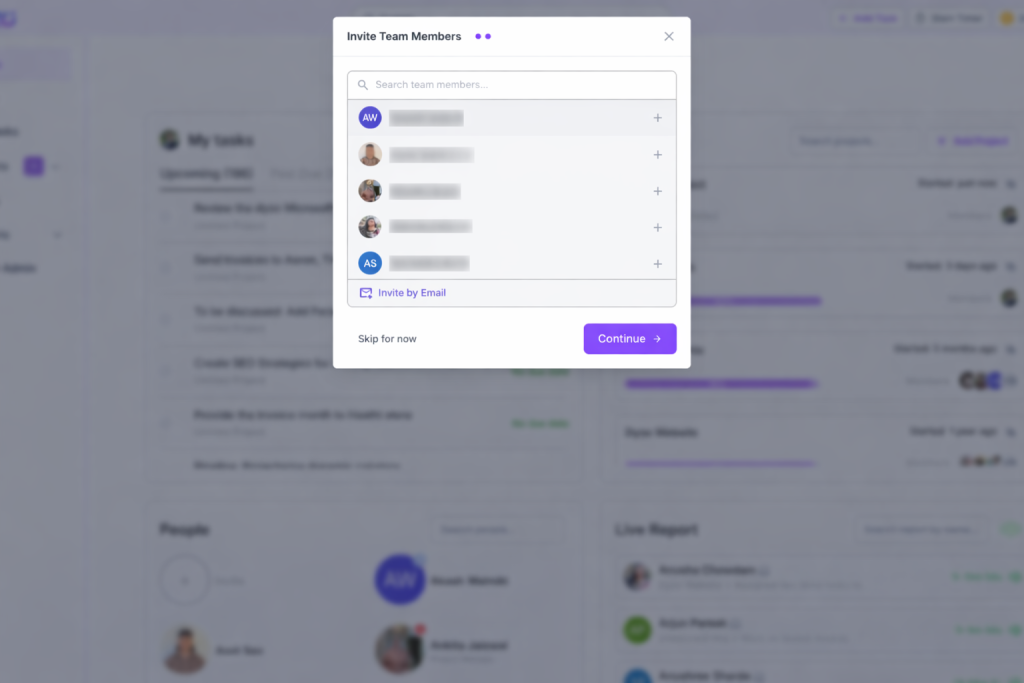
Step 4: Invite Outside Members via Email
If you need to add someone from outside your organization — a freelancer, client, or contractor — scroll to the bottom of the member list and click Invite by Email. A new dialog will appear: Invite User. Here you will see a note that says "Invited users will be automatically added to this project." In the User Email(s) field:
- Type an email address and press Enter to add it
- You can add multiple emails at once by pressing Enter after each one, or by pasting a list of emails
Once all emails are entered, click Invite User. Each person will receive an email with a link to join your Dyzo workspace and will be automatically added to your project upon acceptance. 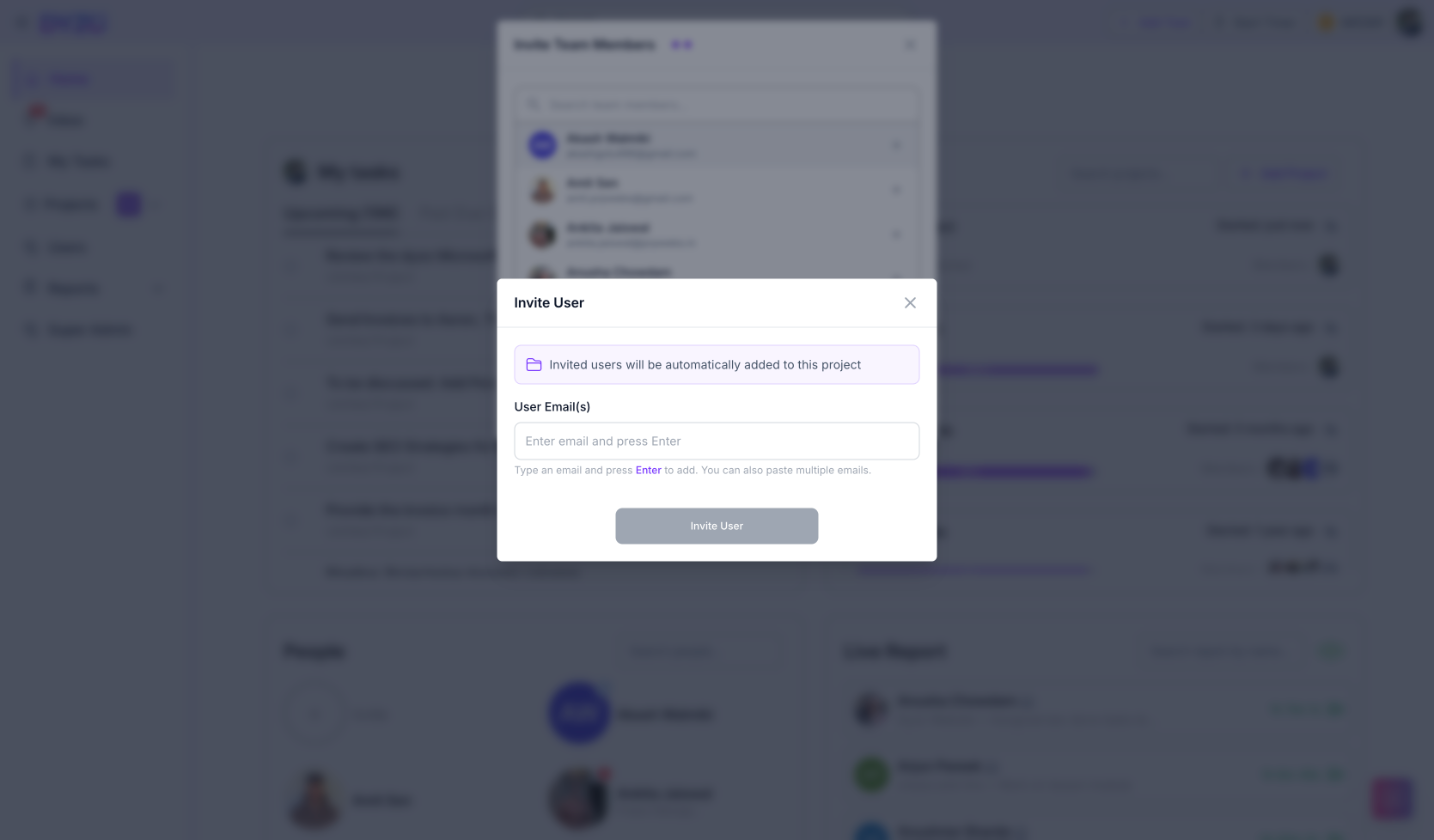
Step 5: Continue or Skip for Now
After adding members, click Continue to finish setting up the project. If you are not ready to add members yet, you can click Skip for now and add them later from inside the project.
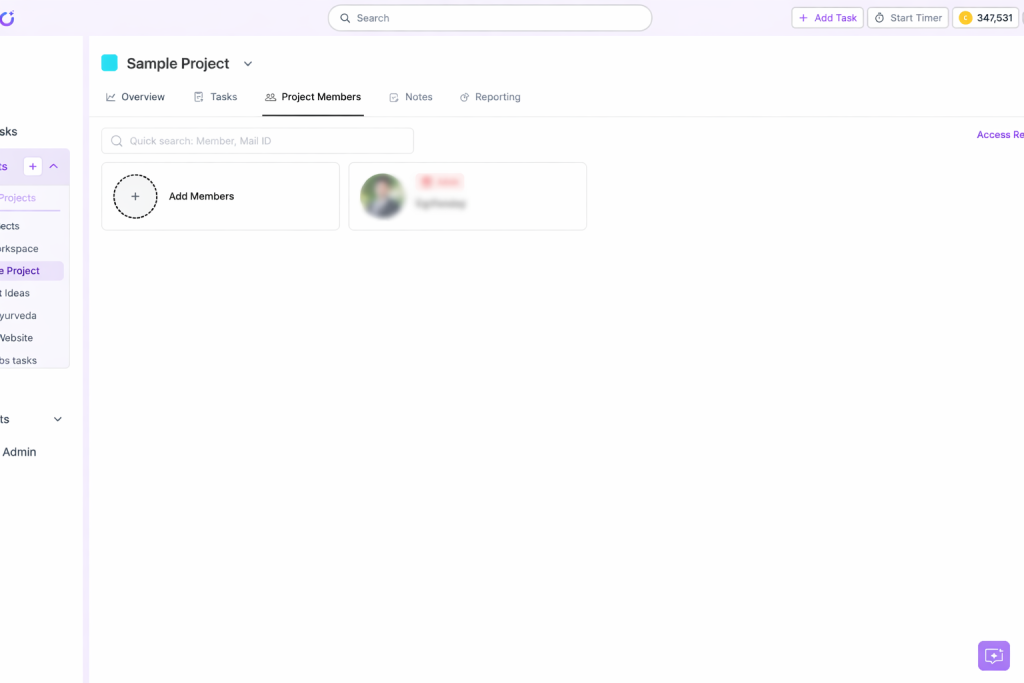
How to Add Members to an Existing Project
If a project already exists and you need to add new members to it, here is how:
- Open the project from the left sidebar or from the Projects section on your dashboard.
- Click the Project Members tab inside the project.
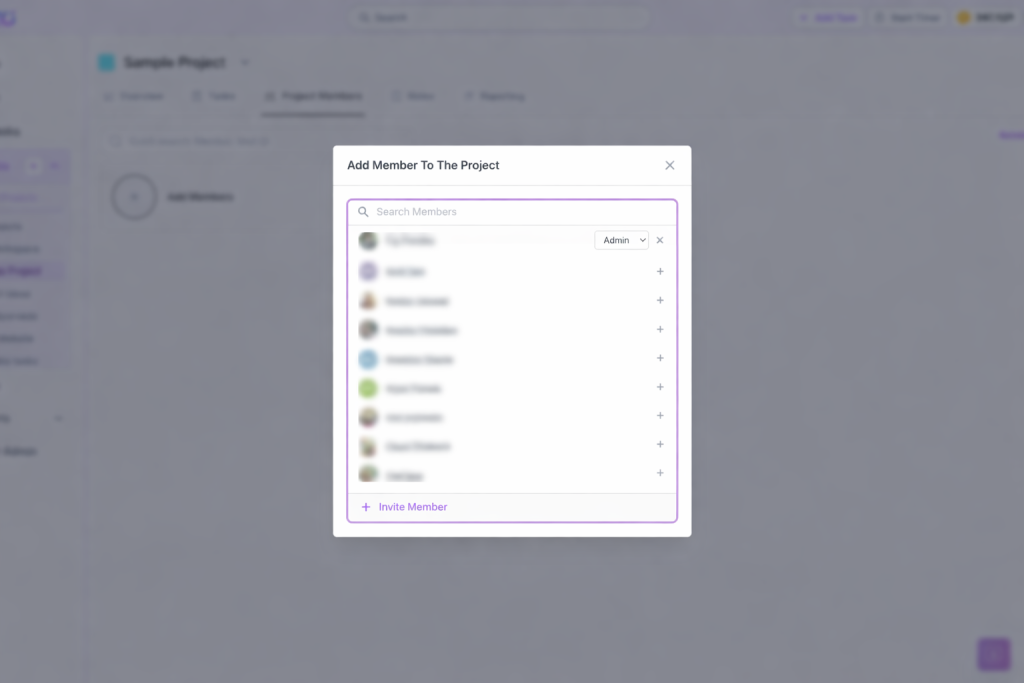
- Click the Add Members card (the one with the dashed circle and + icon).
- An Add Member To The Project dialog will appear. You can search for in-house members and click the + button next to their name to add them directly.
- To invite an outside member, click + Invite Member at the bottom of the list. The same email invite flow will appear — enter one or multiple email addresses and send the invite.

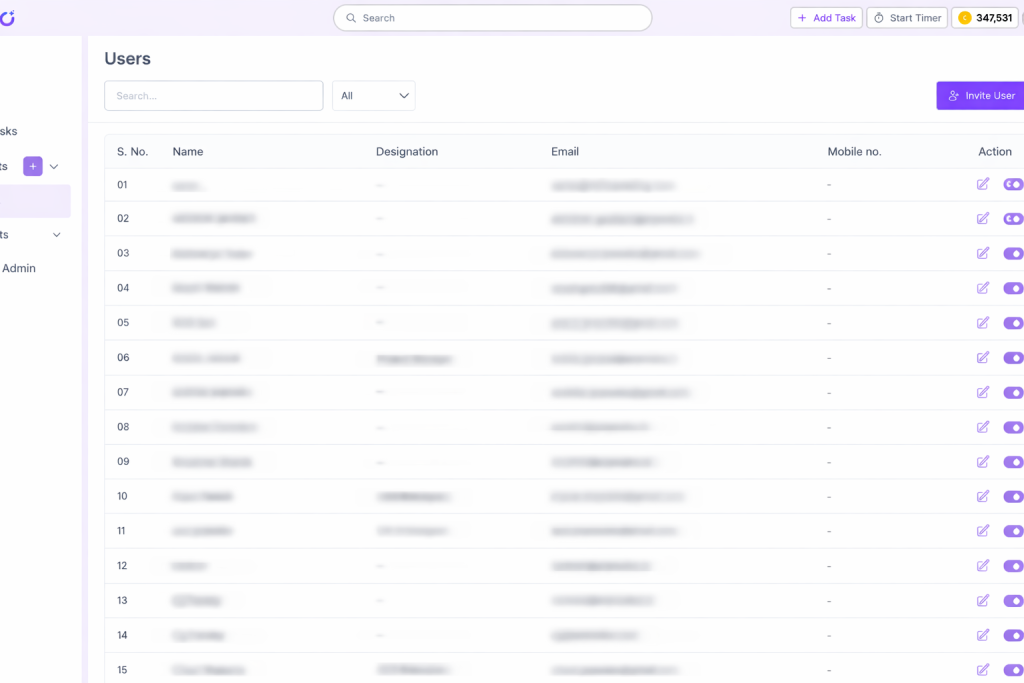
How to View and Manage All Users
For a complete view of all users in your organization, go to Users in the left sidebar. This page shows you every member in your workspace along with their name, designation, email, and mobile number. From the Users page you can:
- Search for a specific member by name or email
- Edit a member's details using the pencil icon
- View a member's profile using the eye icon
- Activate or deactivate a member using the toggle switch
- Invite a new user directly from this page using the Invite User button in the top right
Pro Tips
Set up your project before inviting anyone. Since membership is tied to projects in Dyzo.ai, always create the project first. This ensures that every person you add is immediately connected to the right work context. Add multiple outside members in one go. When inviting external members via email, you do not need to send invitations one by one. Enter all email addresses in the invite field by pressing Enter after each one, or paste a comma-separated list. One click sends all invites simultaneously. Use the Users page as your master directory. The Users section gives you a bird's eye view of your entire organization — who is active, who is inactive, and their contact details. Use it regularly to audit access and keep your team list clean. Deactivate members who have left. When someone exits your team, deactivate their account immediately from the Users page using the toggle. Their historical data remains intact for reporting, but they lose access right away.
Common Mistakes
Mistake 1: Skipping project creation and trying to add members directly. In Dyzo.ai, team members are added within the context of a project. There is no way to add someone to a floating team without a project. Always create the project first, then add members to it. Mistake 2: Not inviting outside members correctly. If an external collaborator is not receiving their invite, double-check that their email address was entered correctly and that the invite was sent using the Invite by Email option, not just the in-house member search. Outside members must go through the email invite process. Mistake 3: Leaving departed team members active. An active but unused account still shows up in your team reports and project member lists. It creates noise in your data. Deactivate accounts as soon as someone leaves your organization. Mistake 4: Adding everyone as Admin. When setting up a project, give team members the role that matches their actual responsibility. Admins have full access. Most team members should be added at a lower permission level to protect your project settings and reporting data.
FAQs
Do I need to create a project before adding team members?
Yes. In Dyzo.ai, team membership is organized around projects. You must first create a project, and then add members to it during or after the project creation flow.
What is the difference between in-house members and outside members?
In-house members are users already registered in your Dyzo organization. They can be added to a project directly with one click. Outside members — such as freelancers or external contractors — are not yet in your organization and must be invited via email. They receive a link, accept the invite, and are then automatically added to the project.
Can I send invites to multiple people at the same time?
Yes. When using the Invite by Email option, you can add multiple email addresses in one go. Type an email and press Enter to add the next one, or paste multiple emails at once. A single click on Invite User sends all invitations simultaneously.
What happens after an outside member accepts the invite?
Once they accept the email invitation and create their Dyzo account, they are automatically added to the project they were invited to. Their time logs, task assignments, and activity will start appearing in your project reports from that point forward.
Can I add a team member to more than one project?
Yes. A single team member can be added to multiple projects. Their time logs will be categorized based on which project they are working in when they start a timer.
What happens to a member's data if I deactivate them?
Deactivating a member removes their access to Dyzo but preserves all their historical data — time logs, task completions, and activity records. You can still include their past work in reports for any time period before deactivation.
How does billing work for team members?
You only pay for the time a team member is active in the system. Billing is calculated on a day-wise basis, so the moment a member is removed once a project is done, the billing stops for that member. There are no charges for members who are no longer in the system.
Does the cost differ for in-house members vs. outside members?
No. Irrespective of whether a team member is in-house or added from outside, the cost remains the same.
Does Dyzo.ai support agent users?
Yes! We now support agent users as well. The cost for agents is the same as for normal users — no difference in pricing.
What is the approximate cost per user or agent?
The approximate price for 1 user or agent is around $1 – $2 per month. The exact cost may vary depending on how much that individual uses Dyzo.ai.
Summary
Getting your team set up correctly in Dyzo.ai is the foundation of everything else. Once your projects are created and members are added — whether in-house or via email invite — every feature in the platform connects automatically: time tracking, attendance, task management, and reporting all tie to the right people. Dyzo gives remote team managers the visibility they need to run distributed teams with confidence. That visibility starts the moment your team structure is in place.
Related Guides You May Like
- How to Create and Assign Tasks in Dyzo.ai
- How Dyzo's Screenshot Time Logging Works
- How to Generate Project and Attendance Reports in Dyzo.ai
Ready to try Dyzo for free?
Plan work, track time, and automate busywork — all in one place.
Start Free with Dyzo →No credit card required · Free forever plan · 2-minute setup